How to Install a Reverse Osmosis System: Under-Sink DIY Guide
 Andrew
July 09, 2025
#DIY
#installationguide
#reverseosmosis
#rofilter
#waterquality
Andrew
July 09, 2025
#DIY
#installationguide
#reverseosmosis
#rofilter
#waterquality
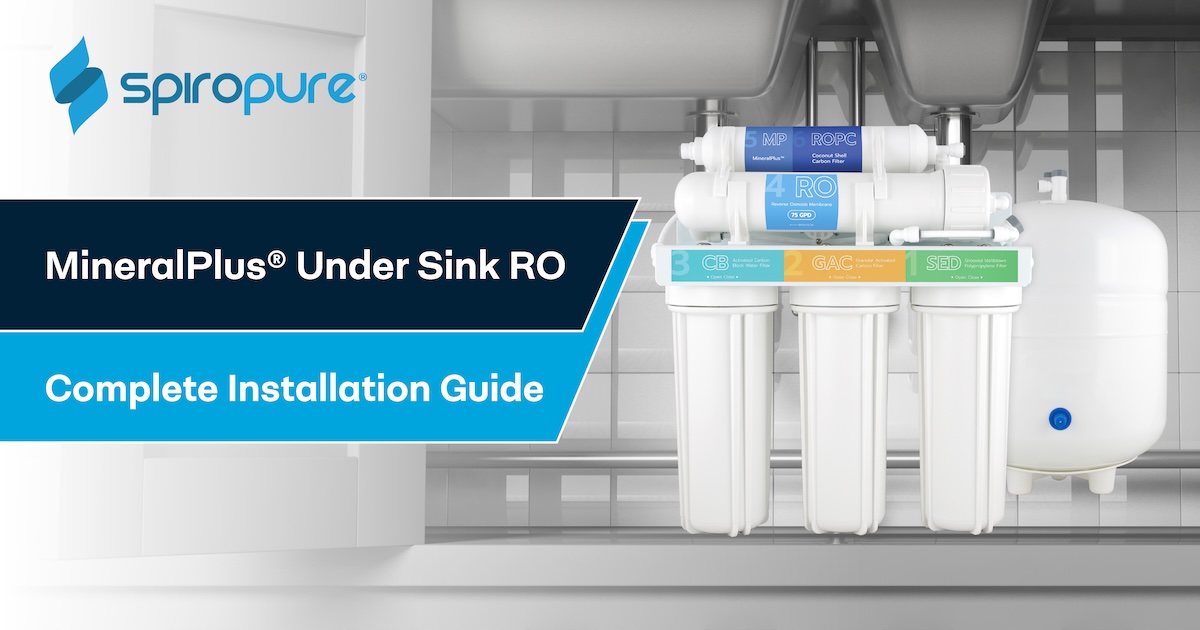
Traditional RO systems like the SpiroPure SP-R0100MP use your home's existing water pressure to filter water gradually into a pressurized storage tank, then deliver it on-demand through a dedicated faucet at your sink (as long as the tank has water in it).
The filtration process creates a wastewater composed of the rejected dissolved solids, which is drained from the RO membrane. This technology provides comprehensive contaminant removal in an otherwise simple package.
It's a level of filtration that most other under sink "point-of-use" systems simply can't match, delivering nearly pure H2O that premium systems then enhance by adding back beneficial minerals like calcium and magnesium for better taste and health. (Want to learn more? Read All Filters' informative article How Does Reverse Osmosis Work: A-to-Z Guide.)
When you install RO systems yourself, you avoid professional installation costs while gaining valuable hands-on knowledge about your water treatment system.
Unlike expensive whole-house systems that can cost thousands, traditional under-sink units are both affordable and relatively easy to install, making them an attractive alternative to bottled water for families.
Now to address the question of how to install a reverse osmosis system. Our comprehensive installation video above walks you through each step, but here's what the process looks like:
Starting Smart: Begin by scanning the QR code on your system's box to access the full manual, then verify all components using the parts checklist. Gather your tools—you'll need basic items like a utility knife, Phillips screwdriver, adjustable wrench, drill with a 3/8" bit, and a bucket.
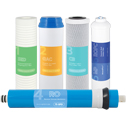
Preparing Your System: The magic starts with installing the pre-filters. Stages one and three work in either direction, but stage two's GAC filter has a clear plastic lip that faces upward. The RO membrane slides in with its double O-rings pointing down—gentle pressure ensures proper seating.
Making the Water Connection: Turn off your cold water supply and disconnect the faucet line. The feed water adapter installs between your existing plumbing with proper O-rings (no Teflon tape needed for gasket connections). Keep the adapter valve closed for now.
Installing Your Dedicated Faucet: Use a pre-existing soap dispenser hole or drill a 1" hole in your sink or countertop. Professional assistance is recommended for granite, marble, or porcelain surfaces to prevent cracking.
Pre-Filter Flush: Here's where our installation video improves on traditional approaches—flush your pre-filters before connecting the RO membrane. This protects your membrane from loose carbon fines and extends its life.
The Final Connections: Connect tubing systematically: white from feed adapter to stage one, blue from final filter to faucet, yellow to storage tank, and black waste line to drain saddle (positioned at least 1.5" above the P-trap). The drain line must slope downward without loops to prevent backflow.
System Startup: With all connections secure, slowly open your water supply and check for leaks. Flush the RO membrane for three minutes, then run the faucet for 10 minutes, discarding all water. Fill and flush the storage tank twice before enjoying your first glass of pure water.

The entire reverse osmosis system installation process takes most DIYers 2–4 hours. It typically takes 1–3 hours to fill the tank initially (discard the first two tanks on a new installation) or if it has been drained completely from use. But your system will continuously filter clean water, replenishing the tank when water is used. RO water can be even better than what's found in some kinds of single-use water bottles, while reducing the need to purchase bottled water, which can be expensive and contributes to plastic waste.
Watch our complete installation video above to see each step in action, including pro tips for leak-free connections and troubleshooting common challenges. For more information, see the official installation and instruction manual.
RELATED PRODUCTS

SpiroPure SP-RO100MP RO Filter System Under Sink 6-Stage with Remineralization
List Price: $318.00
Our Price: $159.00
Save: $159.00
SpiroPure SP-RO125MP RO Filter Replacement Set 12 Month 6-Stage with Remineralization
List Price: $99.98
Our Price: $49.99
Save: $49.99
SpiroPure 1000 GPD Tankless RO System with Remineralization SP-RO1000TL
List Price: $452.00
Our Price: $319.70
Save: $132.30


